Compared to previous versions, the latest version of Microsoft’s PC OS is faster and has a better design, although everything can be better. If your computer is already a few years old and you want to make it run faster and improve its performance, you’ve come to the right place.
We show you all the ultimate tricks to optimize your Windows 10 through firmware or hardware. Although keep in mind that we can’t work miracles, if you have a fairly old computer and following this guide you don’t get optimal results, it may be time to check out some of the best optimization tools for Windows to help boost performance or buy a new one.
Contents
Enable Windows 10 Fast Startup
Fast Startup works by pre-loading the Windows kernel and installing drivers before your PC shuts down. This is an excellent optimization option if your device takes quite a while to boot.
First, you will need to enable Hibernate Mode by following the steps below:
- Press the Windows + X keys.
- Choose the Windows PowerShell (Administrator) option.
- Execute the following command inside the Command Prompt: powercfg/hibernate on.
These steps will enable the hibernate mode. Now you can configure the fast Startup to optimize your computer by following the steps below:
- Press the keys Windows + R.
- Enter the Control Panel command.
- Select the System and Security tab.
- Click on Power Options.
- On the left, there will be a list of options. Select Choose the action of the Startup/Shutdown buttons.
- Click Change settings not currently available to grant administrator permissions.
- Check the Enable Quick Launch checkbox.
- Select Save Changes.
Remember that you should not abuse this function because it can bring inconveniences with the updates of Windows 10. Whenever you update the system, you should deactivate the fast Startup.
Eliminate the programs that start automatically
When your computer is turned on, programs that consume resources in the background are automatically activated, slowing down your PC’s performance. To suppress the automatic activation of this kind of program, do the following:
- Use Windows + X.
- Then, choose the Task Manager tab.
- Go to the tab called Startup
- At this point, you will see a list of programs that will say Enabled or Disabled. The Enabled ones are the ones that start with Windows.
- Choose the program you want to prevent from starting with Windows and click on Disable in the window’s lower right corner.
Be sure to disable only those programs that do not affect the system’s operation. If you have doubts about the program, you want to disable or do not know what functions it performs, do a quick search on the Internet, or choose not to disable it.
Update Drivers and Apps
Drivers allow Windows to access your computer’s hardware components, so if they are outdated, they prevent you from improving your PC’s performance.
There are different ways to update Windows 10 drivers, we want to show you the manual mode since it is one of the easiest and safest methods. Besides, it will only take you a couple of seconds.
- Press the keys combination Windows + X.
- Click on Device Manager.
- You will now find a list of all the devices connected to your computer. Identify the one giving you problems and that you want to update.
- Right-click on it and choose the Update Driver tab.
- Select the option to check for a driver automatically.
- If the system detects an update, it will inform you before installing it.
If the problem is not solved automatically, install the driver you downloaded by selecting the “search for the driver on your computer” option. Verify that the driver has all the necessary folders to install correctly, and make sure to keep the drivers updated manually regularly.
Uninstall programs and applications that you do not use
In general, Windows 10 system comes by default with specific programs you never really use. You may also have had to download programs or applications at particular times which have become unused without deleting them from your system.
All these programs take up storage on your computer, making it run slower the more space it takes up. For this reason, if you are looking to optimize your PC, it is time to find all those programs you do not use daily and uninstall them.
To do this, follow these steps:
- Press the keyboard combination Windows + X.
- Click on the Applications and Features tab. When you have opened this option, a long list of applications will appear, those that your computer has installed.
- Find and select the applications you want to remove and click “uninstall.”
Disable unused services
This option to optimize the PC is more advanced than the previous sections, so we recommend following these tips only if you have computer knowledge. One wrong step and you could ruin your entire system.
To disable services, follow these steps:
- Press the keys Windows + X
- Choose the Run option. You can also press Windows + R
- In the new window, type services.msc and click OK.
- The Services window will open, and you will see a list of the different services there.
- Choose the one you want to disable
- Right-click on it and go to the Properties tab.
- From the new window, choose the Stop option.
- Then, drop the menu under Startup Type and choose the most appropriate option.
Remember that you can change the startup type of each service to automatic or manual or choose the option to disable them continuously. You can check which services need to be active in the “properties” tab and the “dependency” section.
Optimize visual effects
Reducing the visual quality, i.e., disabling minor visual effects that take up a large amount of RAM, will help you significantly optimize your computer. To disable visual effects, follow these steps:
- Press the keyboard combination Windows + R.
- Type control panel and click OK.
- Click on System and Security.
- Choose the tab System.
- Click on Advanced System Settings.
- Go to the Advanced tab.
- Look for the Performance option and click Settings.
- Among the options, choose Tune for the best performance.
Optimize CPU performance
Sometimes, some programs consume too many resources causing your computer to run slowly and tediously. There are several solutions to this problem, for example:
- Restart the PC.
- Clear RAM cache.
- Try other browsers.
- Update applications.
- Remove unused extensions.
- Free RAM space from the Task Manager.
- Clean page file.
- Swapping images for performance.
You can how to free RAM in Windows 11 space and consume less CPU.
Use the Performance Monitor option
The Performance Monitor tool can create a detailed report on your PC, look for performance problems, and suggest fixes for optimization. Although this option does not automatically speed up your system, it will allow you to identify issues so that you can fix them.
To complete analysis with this tool, you only must press the keyboard combination Windows + R and execute the command: perform/report. At that moment, the Performance Monitor will start collecting data, which can take a few minutes.
At the end of the process, you will find a lot of information you may need to learn how to interpret, do not be overwhelmed. We recommend you start with “Warnings” because this will show the most significant problems identified and how to fix them to optimize and speed up your Windows 10.
In the Resources Summary option, you can also check the CPU, network, disk, and memory efficiency.
How Rambox helps you optimize your PC
The mere fact of using Rambox already presents benefits in terms of consumption since the app’s main objective is to get rid of using different desktop apps or opening several websites in their browsers which, in the long run, increases the use of resources in users’ systems. Rambox concentrates the applications and websites desired by users into a single desktop application, which helps mitigate CPU consumption and overflow.
Rambox comes with an internal App Manager dashboard, which displays real-time metrics for each application and process running within Rambox. Here, users can disable applications or kill processes as well. Just open the quick search panel (Alt+Shift+K) and type “app manager” to find it.
Rambox also allows you to instantly disable applications you are not using at the moment, which may be consuming a considerable number of resources in the background. Right-click on the application and select “Enabled” to activate or deactivate the application.
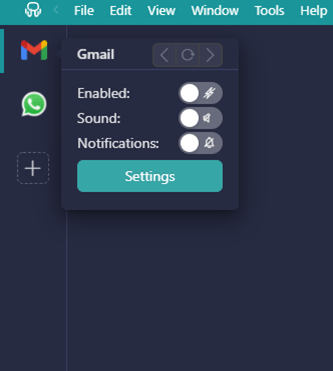
At the same time, Rambox offers an option to automatically hibernate any desired application after a period of idle time, which restricts it from using main memory and pauses its background usage to preserve resources. At this point, you can set some minutes of inactivity, after which the application will be hibernated.
You can also start the desired application that is already hibernated and “wake it up” when you decide to use it. To configure this option, you only have to right-click on the application, select “Settings”, and add the time you consider appropriate.
When Rambox detects that some application is consuming a reasonably high amount of CPU, or if the amount of CPU consumption is unusual for a short time, you will be automatically notified so you can reload or disable the application and prevent it from endangering other applications or slowing down Rambox in general.
If you are overwhelmed by the number of applications you have to work with, consuming your RAM, and making your desktop extremely low, try Rambox for free. All you have to do is download the program, configure it to your liking, and enjoy its functionalities. No cards, no cheating, it’s that simple!